
A disk sander offers many advantages, from its quick finish to its mitre gauge. These sanders tend to be a little less portable than some other models but can still produce the same high quality results. Find the one that suits your needs and continue reading to learn more. Here are the top benefits of a disc sander. A sander that incorporates both sanding methods is the best option.
For face sanding, disk sanders can be used
The versatile disk sander can be used to sand a variety of surfaces. The rotating disk, supported by an aluminum or steel backing plate, spins up and down to sand the face of a material. The center screw and washer of the disc are hidden, and don't protrude into the work surface. The worktables of benchtop disk sanders can be adjusted for miter gauge slots and end cuts. Most disc diameters are between four and eight inches. Larger models have capacities of 12 inches or greater.

They provide fast finishes
Disk sanders offer speed and efficiency. There are many sizes available for disk sanders. They can be used to make small machines or large industrial machines. A majority of home shops come with a 12” diameter disk. The majority of disks are made from pressure-sensitive adhesive material. If you need a quick smooth finish on a project, a disc sander is a good investment.
They are much smaller than other sanders.
A disc-sander is a handtool that can be used to make rough cuts on small and thin objects. These sanders are smaller than other types. Although they aren't as portable as other sanders but can still be used for many hand tasks, including sanding metal, plastic and wood. They are both small- and large-sized and affordable. They are also great for shaping and smoothing various types of materials.
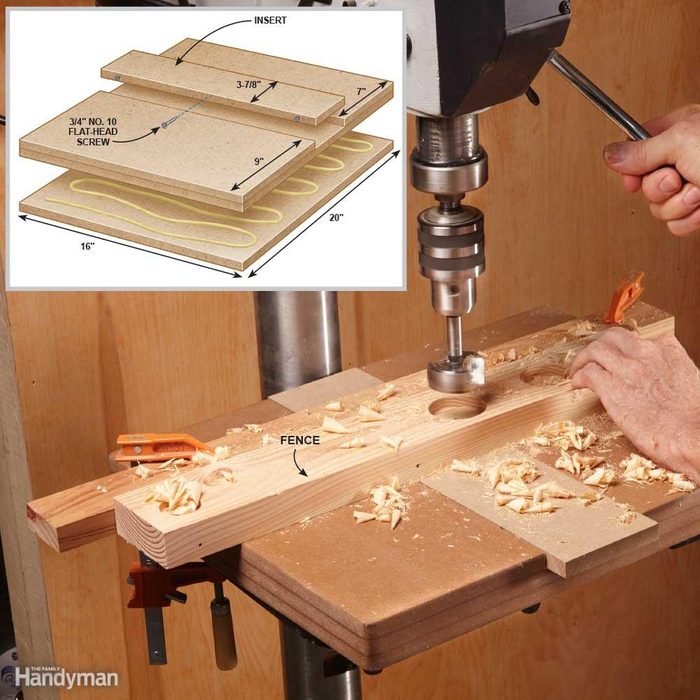
They have a mitre gauge
A disk-sander has several benefits, including a mitre gauging feature. First, this feature guides the workpiece against the disc, avoiding tearout. It then raises the fence, protecting your fingers and hands from the blade's edge. Finally, you can use a clamp to lock the miter gauge in place. Bernard Lewan provided this tip. Here's how to do it.
The adjustable table is included.
Setting the table's height or tilt is the first step to using a disk-sander. When using a table with an adjustable height, make sure that the workpiece is overhanging the table. If it doesn’t, the workpiece might hit the sanding plate. Make sure to check all controls on the table including the powerplant, carriage, table height and quill lock. A miter gauge extension can be added if you need additional support.
They are equipped with dust ports
The disk sander is associated with a dust collector housing. The dust collector housing surrounds the entire sander, while the front half of the housing is exposed to the workpiece. The dust collector housing must be removed and the front part of the sander should be exposed to expose the disc. A hex wrench 34 is included for quick release of bolt 90. Bolt 90 must also be tightened to ensure that the bed 16 is in its vertical position.
FAQ
Which woods are good to use for furniture-making?
Woods are classified according to their hardness. Softwoods include cedar and pine as well as cedar and cedar. They're often used for outdoor furniture because they don't rot easily. The hardwoods include teak, maple, mahogany and oak. Because they are not weather-resistant, they are best used indoors.
How much should a skilled woodworker earn per hour?
Hourly rates for professional woodworkers vary depending on many factors such as skill, experience, availability, geographical location, and other variables.
The hourly average rate for skilled woodworkers runs between $20-$50.
An hourly rate of $10 for a less skilled woodworker could be possible.
What's the difference?
Hobbyists like making things with wood. Professionals focus more on quality. Hobbyists often take pride in the creations they make and often share them to family and friends. Professionals will spend hours looking at designs before they start to build a project. They'll be meticulous about every aspect of their work, from choosing the best materials to finishing it perfectly.
Statistics
- Overall employment of woodworkers is projected to grow 8 percent from 2020 to 2030, about as fast as the average for all occupations. (bls.gov)
- The best-paid 10 percent make $76,000, while the lowest-paid 10 percent make $34,000. (zippia.com)
- Average lumber prices rose about 600 percent between April 2020 and May 2021. (familyhandyman.com)
- The U.S. Bureau of Labor Statistics (BLS) estimates that the number of jobs for woodworkers will decline by 4% between 2019 and 2029. (indeed.com)
External Links
How To
How to stain wood
Staining wood is the process of applying chemicals to the wood's exterior, which alters its color. This chemical reaction causes wood to turn from whiteish to brownish. Oak is the most common wood type for staining. However, you can also use other wood types.
There are many options for applying stains to wood surfaces. You can mix the stain with a solvent, such as turpentine, and spray it onto the wood. Others use a solution made up of water and dye, which is then applied directly onto the wood. The stain can be mixed with paints and varnishes to become part of the final coating.
The first step in staining wood is preparing the surface. The wood must be thoroughly cleaned to remove all grease and dirt. Sanding can smoothen out scratches and uneven spots. The next step is to choose the stain type you want. There are two types of stains that can be used: penetrating and non-penetrating. Penetrating stains penetrate deeper than non-penetrating stains, which makes them great for dark colors like mahogany. Penetrating stains are best paired with lighter colors, such as maple.
After choosing the type and application method you prefer, gather your tools. The best tool for applying stains is a paintbrush. It allows you to evenly distribute the liquid over the surface. A few rags are also handy to clean up any spillages after you have finished painting. If you are planning to mix your stain, ensure you have enough containers for each component.
Once you have prepared all your materials, it is time to clean the areas where you will stain the wood. Use warm water and soap to clean away dirt and dust. Wipe the entire piece of furniture with a rag dampened with clean water. Be sure to get rid of all loose material, especially if staining is planned for darker wood.
Next, spray the stain. Start at one end of the piece of furniture and brush or spray the stain onto the wood. Move slowly and carefully along the grain of your wood until you reach its opposite end. You must be careful not to allow the stain to drip off the wood's edges. Before moving on to the next steps, allow the stain drying completely.
To protect the painted surface, apply a coat of clear polyurethane sealant. Three coats of polyurethane sealing agent are required. Allow the third coat of polyurethane sealer to dry overnight before applying the final coat.