Chip carving can be difficult if you've ever tried it. There are many techniques and styles that you could try. But which one should you choose? What tools are necessary? This article will give you my top tips and tricks when carving chips. You can carve potato chips in a traditional or more modern way, but there are some essentials that will help you succeed.
Traditional
Chip carving is one the oldest forms decorative woodcarving. This requires a straight-edged or offset knife. Chip carving involves making small triangular cuts in wood to create patterns. This art form developed over 1,000 years ago. It has been adapted in many other countries. It was so popular that many designs looked the same across nations, making it difficult to tell which one was which.
As wood carving became more common, skills were passed on from generation to generation. Chip carving is a popular method of decorating furniture in Sweden. In fact, there were even schools that taught the art. Modern chip carvers are able to benefit from the centuries-old skills and knowledge of carvers. Through the generations, knowledge and experience was passed down from carver to apprentice and student. It's a continuous process that continues into the present.
Form free
If chip carving has been something you've wanted to try, this is the place for you. Murray Taylor provides a DVD showing you how to create both freeform or geometric carvings. It is a wonderful introductory project, with lots of information. English and NTSC formats are also available. The DVD can be purchased in stereo or widescreen. Artisan Media Ltd. owns the DVD and it's available in MP4 for Windows and Mac computers.
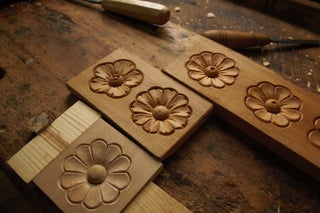
Triangles, circles and lines are the basic shapes of geometric chip carving. The technique allows for unlimited shapes and patterns and can be used to combine different styles. This is also known free-form chip carving. It doesn't matter if you want your chips to look like a flower or a dragon. They will make a great addition to any room. It is possible to combine many techniques in one piece using free form chip carving.
Techniques
Chip carving has been practiced for hundreds of years. Many countries have examples of chip carving. Chip carvings have been discovered on paddles and handles for ceremonial tools in the South Pacific Islands. These carvings were most likely done using bits of bone and sea shells, but some people have reported using shark teeth as well. This book demonstrates how you can use a variety different chip carving techniques to create incredible designs.
It is simple to carve chips if you follow a few basic techniques. This includes learning how to carve the fine triangle. This pattern is very easy to comprehend and execute. Simply carve several triangles and continue this process until you have carved the pattern. However, chip carving doesn't have be boring. Variation of the triangles can give you a wide variety of patterns.
Tools
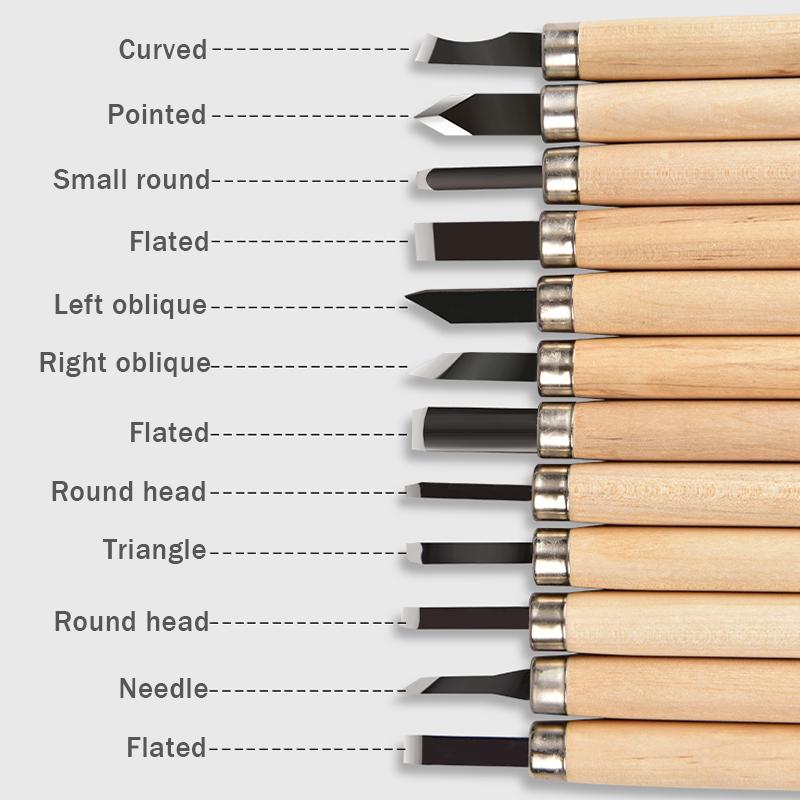
Lora S. Irish offers a free online seminar that will teach you the basics of chip carving. She teaches you how to use various carving tools and supplies, including a chip knife, stab knife, and detail bench knife. Irish will also cover the various types of wood carving tools in this free seminar. Choose from the below list to find the right tool that suits your needs. These tools can be used for creating simple shapes and designs or to make intricate designs.
Special geometry is used to create a chip carving knife. It is one-half inch in length and has an angled back edge. This allows for precise incisions. A sharp point is essential to ensure that edges meet perfectly. A sharp tip is also available for chip carving knives made of stainless-steel. A chip carving knife should be sharp and sharp enough to slice a bit of wood.
Getting started
First, learn about chip carving. This will vary depending on the type or carving you do. To ensure accuracy, it is important to be familiar with the following principles. Chip carving is a technique that involves creating a fine pattern in wood. Here are some steps to help you create your first chip-carving.
When using a chip carving knife, it is essential to sharpen it well. The blade of the chip carving knife will have bevels on each side, indicating that it is a primary chip carving knife. The sharpening rock is shaped as a diamond, and can produce effective edges. Place the stone at a 10 degree angle. The stone will simultaneously sharpen the chip carving knife and the chip carving tool.
FAQ
What tools should you start with to become a woodworker
Woodworking takes practice and patience. It takes time and practice to master the various techniques and tools required for woodworking.
There are many types of woodworking equipment on the market today. Some people prefer using power tools while others prefer hand tools.
While you have the option to pick what you like, it is essential that you get the right tool for the job. Start with a basic set if you don’t have any previous experience.
You could also try learning how to use a router which is used to cut intricate shapes into wood. These can be found at most hardware shops.
How much money does a hobbyist have to put into getting started?
A lot of capital is required to purchase the necessary supplies and tools if you want to start your own woodworking shop. Start by getting a small circular saw saw, drill press or circular saw. These items are affordable so you won’t break the bank.
What is the average time it takes to finish furniture?
It depends on the type of wood you choose, the complexity of the design, and the amount of finishing you apply. For example, hardwoods require more maintenance than softwoods. Hardwoods are also more expensive than softwoods. They are more durable and can withstand moisture better. It takes between one and three months to finish a piece.
What wooden items do you sell well?
The most successful wooden items are made from sustainable wood.
The most popular types of wood for furniture include oak, maple, cherry, mahogany, walnut, and teak.
These woods have beautiful grain patterns and colors. They are also very strong. They also last for many years if cared for properly.
Wooden furniture should always be painted first to protect against moisture damage. This applies to all surfaces, even drawers and doors.
Choose a paint with water resistance if you want furniture to last as long possible.
You should use a high-quality oil-based primer followed by two coats of top coat. Depending on how often it will be worn, you may need to apply several coats.
Spray cans and aerosol spray paints are not recommended. These products contain solvents which evaporate quickly and leave behind harmful fumes.
Statistics
- The best-paid 10 percent make $76,000, while the lowest-paid 10 percent make $34,000. (zippia.com)
- Woodworkers on the lower end of that spectrum, the bottom 10% to be exact, make roughly $24,000 a year, while the top 10% makes $108,000. (zippia.com)
- Average lumber prices rose about 600 percent between April 2020 and May 2021. (familyhandyman.com)
- Most woodworkers agree that lumber moisture needs to be under 10% for building furniture. (woodandshop.com)
External Links
How To
How to drive a nails in wood
The first step in driving a nail into wood is to choose the correct size and type of hammer. The most popular types of hammers include claw hammers as well as mallets and ball peenhammers. Each kind of hammer has its own advantages and disadvantages. A claw hammer is best for hitting nails or hard objects. However, it can be difficult to pinpoint exactly where the blow will land. A sledgehammer is great for hitting large areas at once, but it's too heavy to use effectively for smaller tasks.
Once you have chosen the right hammer for you, put your hand flat against its side so that it rests comfortably in the palm of your hand. Grab the handle tightly, but do not squeeze too hard. Your wrist should be relaxed while you hold the hammer straight upwards. You should then swing the hammer straight up, keeping your wrist relaxed. You should feel the impact on the nail from the hammer. Try practicing with a block to help you master the art of swinging a stick.
You can now drive the nail by holding the hammer to your body. Position the nail, so it's perpendicular to the surface of the wood. Keep your focus on the tip of each nail. Swing the hammer forward, and then move the hammerhead. Repeat this action several times, gradually increasing the speed of the swing. After mastering the technique, you can add power to your swings. Try holding the hammer above your shoulder and bring it down forcefully. This will help you put more energy behind each of your moves.
Once you've nailed the first hole, remove the hammer from the nail. To pull out the remaining nails, use a screwdriver or pry bar. To prevent splitting the wood, ensure you keep the nail heads flush against the board's surface.